 WriterMorph
Help › Compile & Export
Compile and Export
Turn your manuscript into a PDF, Word, EPUB, LaTeX or other file with Compile Studio presets, page layout, section layouts and a live preview.
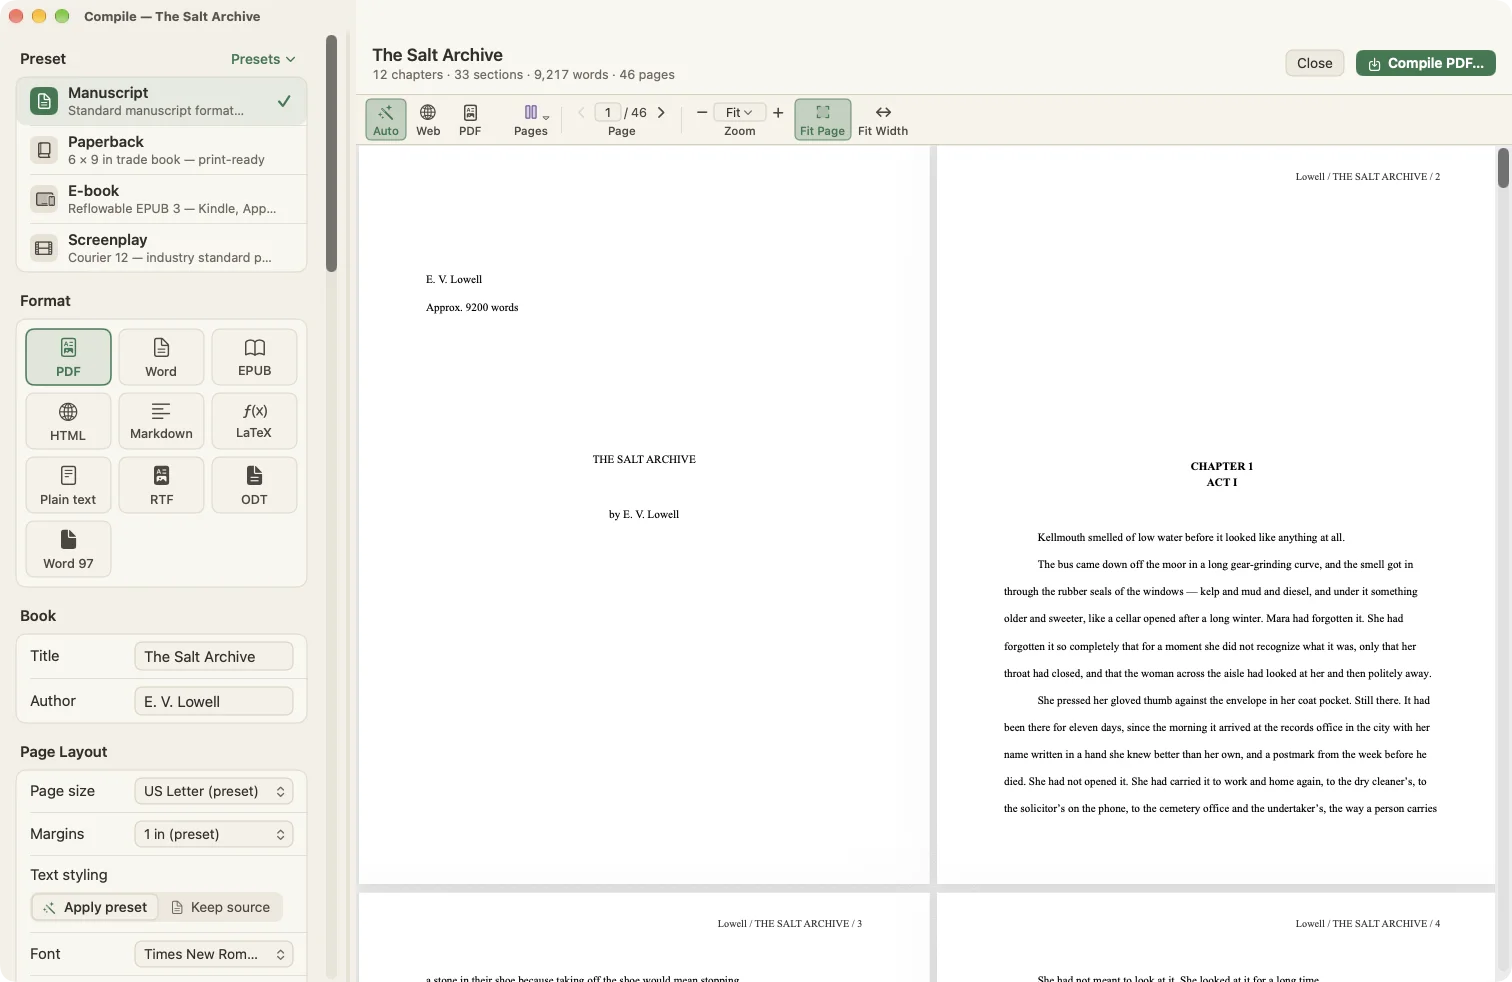
Compile turns the documents in your binder into one finished file: a manuscript for an agent, a print-ready paperback, an e-book, a screenplay page, a thesis or a paper.
Opening Compile Studio
Choose Project › Compile… or press ⌥⌘E. You can also use File › Export › Compile….
Compile Studio opens in its own window:
- Settings on the left, in sections: Preset, Format, Book, Page Layout, Section Layouts, Include, Chapters & front / back matter, Metadata, Replacements and Contents.
- A live preview on the right, with chapter, section, word and page counts.
- Compile
… to save the file.
Step 1: Choose a preset
| Preset | Best for | Look |
|---|---|---|
| Manuscript | Agents and editors | US Letter, Times New Roman 12 pt, double-spaced, 1" margins, "#" scene breaks, chapters on a new page |
| Paperback | A 6 × 9 in trade book, print-ready | Georgia 11 pt, justified, "* * *" scene breaks, large centered chapter titles |
| E-book | Reflowable EPUB 3 for Kindle, Apple Books and Kobo | Georgia 13 pt, no running header |
| Screenplay | The industry-standard Courier 12 page | US Letter, Courier 12 pt, 1.5" left margin |
Change anything you like, then choose Presets ▾ › Save as Preset… to keep your own version. You can also import and export presets as files to share them between Macs. WriterMorph remembers the last settings you used for each project.
Step 2: Choose a format
| Format | Notes |
|---|---|
| Real footnotes at the bottom of the page | |
| Word (DOCX) | Real Word footnotes; comments become Word comment balloons |
| EPUB 3 | Reflowable e-book with linked footnotes |
| HTML | A single web page |
| Markdown | Pandoc-ready, with images in a folder beside the file |
| LaTeX | A LaTeX document with real \footnote commands |
| Plain text | Text only |
| Rich Text (RTF) | Opens in most word processors |
| OpenOffice (ODT) | For LibreOffice and OpenOffice |
| Word 97–2004 (.doc) | For older versions of Word |
Step 3: Book details
Enter the Title and Author. The author defaults to the name in Settings › General › Author Information (your pen name, if you set one). For the Manuscript preset, your address details appear on the title page.
Step 4: Page layout
- Page size: the preset's size, an office size (US Letter, US Legal, Executive, A4, A5, B5, A3), a book trim size (Pocket, 5 × 8 in, 5.25 × 8 in, Digest, 6 × 9 in, Royal, 7 × 10 in) or Custom….
- Margins: 0.5, 0.75, 1 or 1.25 inches.
- Text styling: Apply preset uses the preset's typography. Keep source keeps the fonts, alignment and spacing from your editor and only takes the page size and margins from the preset.
- Font, Size, Alignment and Line spacing.
Running headers and page numbers follow the preset: for example "Surname / SHORT TITLE / page" for the Manuscript preset and alternating author and title for the Paperback preset. Set a Short title under Metadata to control the running title.
Step 5: Section layouts
WriterMorph treats your binder as three levels: Level 1 is the top-level chapters and folders, Level 2 the sections inside them, and Level 3 any subsections.
- Chapter titles and Section titles: choose how they look.
- New page for: every chapter, chapters and sections, every document, or never.
- Numbering: none, chapters (1, 2, 3) or outline (1, 1.1, 1.1.1). Optionally number headings in the text too.
- Scene separator: #, * * *, ❧, a blank line or none.
Step 6: What to include
- Title page, Synopsis and Notes
- Table of contents (for HTML and EPUB output)
- Comments: as Word comment balloons, PDF margin notes or highlighted HTML
- Line numbers: off, restarting on each page, or continuous
- Images placed in your text, and optionally each card's card image at the start of its section
Footnotes are always numbered in order and placed where each format expects them.
Step 7: Chapters and front / back matter
- Chapter title: a pattern such as
Chapter <$n>: <$title>. Placeholders include<$n>(number),<$R>(Roman numeral),<$w>(number in words),<$title>,<$booktitle>,<$author>,<$wc>(word count),<$date>and<$year>. - Front matter and Back matter: pick a folder or document to place at the start or end, without chapter numbers.
- Copyright page and Dedication: each on its own page.
Step 8: Metadata and replacements
- Metadata: subtitle, short title, subject, keywords and a description, written into the PDF, Word, EPUB, RTF and LaTeX file properties.
- Replacements: find-and-replace rules applied only to the compiled output, with options for regular expressions, case-sensitivity and whole words. Your manuscript is never changed.
Step 9: Choose the contents
Under Contents, choose what to compile:
- Entire book
- Current selection
- Current folder
- any collection
A checklist of every document lets you include or exclude individual items. Documents with Include in compile turned off in the Inspector, and research or reference material, are left out automatically.
Tip: To exclude a document permanently, select it and choose Documents › Include in Compile (toggle).
The preview
The preview shows real PDF pages for PDF output and a web preview for other formats. Choose Single Page, Continuous or Two Pages Side by Side, step through pages, and zoom from 50% to 300% or to fit the page or width.
Exporting other things
| What | Where |
|---|---|
| The whole manuscript as RTF | File › Export › Rich Text (RTF)… |
| The canvas as an image | File › Export › Canvas as PNG… or Canvas as PDF…; or the planner toolbar's download menu (PNG, JPG, PDF) |
| The planner as data | File › Export › Planner JSON… |
| The project as an Obsidian vault | File › Export › Obsidian Vault… |
| A Writer Timeline view | The timeline's Export button (PNG or PDF) |
| A single card | The card editor's export button (Print / PDF, Word, HTML, Markdown, text) |
| A Note, Markdown or HTML tab | The tab's Export ▾ menu (print, PDF, PNG, JPEG, Word, source) |
In a standalone Manuscript tab, the header menu also offers quick Compile to HTML…, Compile to Markdown… and Compile to Plain Text….